Thursday, September 1, 2011

Plum-ped No.1: Plum Sorbet

So recently I was back home in Ireland visiting my family. A few years ago I built a huge fruit and veg patch at the back of the garden and planted apple trees and plum trees as well as various berries. When I was home I found the plum tree nearly breaking under the weight of all the fruit growing on it's branches.

Fearing that they would go rotten before we got to eat them all, I decided to make some dishes to use up all the fruit. The first one is a refreshing plum sorbet. It's quite easy to make and you don't necessarily have to use the vanilla and cinnamon if you don't want to. The only awkward thing is having to keep removing it from the freezer in order to mix. Of course, if you have an ice-cream maker then this is no problem at all.

Ingredients
750g Plums
500ml Boiling Water
500g Caster Sugar
1 Vanilla Pod
1 Cinnamon Stick

Method:
  • Put the water and sugar in a saucepan & stir until the sugar has disolved.
  • Add the Vanilla, Cinnamon & Plums.Place on a moderate heat & simmer for 10 minutes.
  • Remove the plums from the saucepan using a slotted spoon & allow both the plums & the syrup to cool.
  • Cut the plums, removing the stones, & place them in a food processor with the sugar syrup. Blend until pureed.
  • Place the puree in a freezer proofed sealed container and place in the freezer. After 1 hour, remove & stir. After that, take out & stir every 30 minutes for 2 hours. Then return to the freezer until ready to serve. 
  • Enjoy

Monday, August 22, 2011

Chicken Kiev with Spiced Potato Wedges

Well this will be a bumper recipe post today. A complete meal in fact. This is a classically simple mid-week meal that can be prepared in advance and cooked very quickly. It's also really cheap (which is always a good thing).

We've probably all had those store-bought Chicken Kievs; the processed mounds of chicken meat with a reservoir of garlic butter in the centre. Pretty tasteless. Here is how you make them for yourself from scratch. I'll start with how to make the garlic butter, which can be used for garlic breads or steaks or to flavour any other dish you're cooking. Then I'll show you how to make the chicken kievs themselves. I'll leave the quantities out because the amount of ingredients vary so widely. I served them with spicy potato wedges which can be used as a sidedish to any meal and are a cheap and healthy alternative to the frozen wedges you buy in the shops.


Garlic Butter
Ingredients:
250g Salted Butter
6 Cloves Garlic (or more if you want a stronger taste)
2 Tsp Mixed Herbs (Parsley, Oregano, Basil etc)

Chicken Kiev
Chicken Breast Fillets
Egg
Flour
Breadcrumbs
Salt & Pepper

Spiced Potato Wedges
1kg Potatoes
1 tbsp Olive Oil
Chilli Powder
Paprika
Oregano
Salt & Pepper

Method:
  • To make the Garlic Butter. Simply soften/melt the butter and add the garlic cloves and herbs. Blitz in a food processor and pour into a container to set. 
  • For the Chicken Kiev, cut a pocket into the side of the chicken breast. Be careful not to cut through to the other side 
  • Have three bowls ready; one with flour, one with beaten egg & the final one with breadcrumbs. Season the flour with salt & pepper.
  • Place a spoonful of the garlic butter in the pocket made in the chicken. Dip the breast in flour, then the egg & finally the breadcrumbs, making sure it is completely coated at each stage. 
  • You can either deep fry the chicken breast until dark brown, or, for a healthier alternative, you can brown on both sides in a frying pan before placing in an oven to bake.
  • For the wedges, chop the potatoes into wedge shapes & place in a bowl. Add the olive oil and herbs to taste (I like spicy food so I added a lot of paprika & chilli). Mix thouroughly and spread out on a baking tray. Cook in oven until crispy. 
  • Enjoy.


Sunday, August 7, 2011

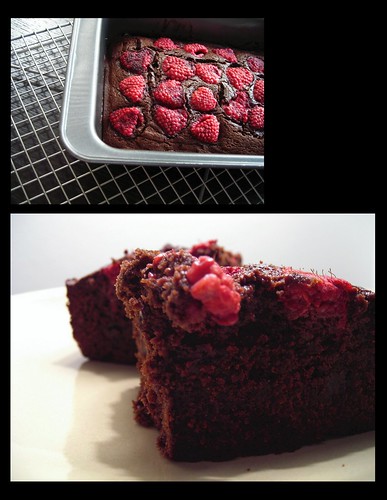
Raspberry Spiked Chocolate Brownies


Unfortunately I can't take the credit for this yummy dessert, that lies with my lovely housemate Jessica who made it all for us. I can however, post the recipe so that everyone can enjoy the delightfulness. It's really easy to make and goes great with ice cream.

Ingredients:
200g Dark Chocolate
250g Butter
350g Brown Sugar
4 eggs
170g Plain Flour
1/4 tsp Baking Powder
45g Cocoa Powder (sifted)
200g Raspberries

Method:
  • Preheat the oven to 180°C. Melt the butter & chocolate over a low heat until smooth.
  • Place the butter & chocolate in a bowl with the eggs & sugar.
  • Sift in the flour, baking powder & Cocoa Powder & mix well.
  • Pour into a 23cm baking tin lined with baking paper. Top with raspberries.
  • Bake in the oven for 45mins or until set. The brownies should be fudgy in the middle.
  • Enjoy

Saturday, August 6, 2011

Cheap and Cheerful Dinners No. 2 : Chicken Quesadillas with Jalapeno Mayonnaise


Time for another cheap and cheerful recipe. It must be the weather that has me craving food from hot countries. Between the Spanish Patatas Bravas and the Argentinian Empanadas I should just start learning Spanish. And here we have another dish, this time from Mexico.

Quesadillas are flour or corn tortillas filled with grated cheese and other ingredients and fried on a pan so that they are crispy. This is a really quick and easy recipe. And because you can put whatever you want in it, it's really cheap and cost effective. I used chicken in this recipe but you can make a vegetarian option or use pork or beef; the combinations are only limited by your own imagination.

Quesadillas go great with sour cream and salsa or simply mayonnaise. I made a nice, spicy Jalapeno Mayonnaise to add a nice kick.

Quesadilla
Ingredients:
Flour/ Corn Tortillas
Grated Cheese (whichever variety you prefer)
Olive Oil
2 Chicken Breasts (Cooked and Diced)
1 Red Pepper (Diced)
1 Onion (Diced)

Jalapeno Mayonnaise
Ingredients:
2-3 tbsp Mayonnaise
1 Jalapeno Pepper (seeds removed and finely chopped)
1 tsp Garlic (minced)
1/2 tsp salt
1/4 tsp Oregano

Method:
  • Heat a frying pan to a medium heat & add the olive oil. Place a tortilla on the pan. Flip it over a few times until air pockets begin to form.
  • Sprinkle the grated cheese onto the tortilla & then add the peppers, onions, chicken (& whatever other ingredients you have) on top. You don't want to layer the ingredients too thick because you will be folding the tortilla over. 
  • Reduce the heat. Once the cheese has melted, fold the tortilla in half, pressing the two sides together. Continue cooking. Once the underside is brown, flip the quesadilla over to brown the other side. 
  • Remove from the pan and cut into wedges. 
  • For the mayonnaise, simply add all the ingredients in food processor and mix together. 
  • Serve the quesadillas with a side salad and drizzle the mayonnaise over. 
  • Enjoy.


Wednesday, July 27, 2011

Nada Como Las Empanadas. Nothing Like Empanadas


I first had Argentinean empanadas (or any sort of empanadas) in a lovely family restaurant in La Bocca, a suburb of Cannes. The area was described as “the ghetto” even though it was probably one of the most beautiful places I’ve seen; right on the beach. I remember not knowing what empanadas were but giggling that they had cumin (it sounded funnier in my head. We had a plate of small empanadas for a starter before the traditional argentine steak, but, for me, the highlight of the meal was those empanadas. They were crispy on the on the outside but moist and flavoursome on the inside…I was floored.

I’ve been meaning to try and make them for a long while and got the urge again recently so I decided to throw caution to the wind and just make them. I made 5 large empanadas, around the size of a Cornish pasty, but you can make smaller, bite sized ones for starters or finger food for parties.

I've included two fillings here; one beef and one vegetarian. These can be made in advance of making the actual empanadas but it's best if you make the dough the same day.

Dough
450g Flour
1/2 tsp Salt
220g Butter
1 Egg
2 tbsp Vinegar
230ml ice water
1 Egg (For Brushing)

Method:
  • In a large mixing bowl, combine flour and salt. 
  • Blend in the chilled butter until the mixture resembles coarse crumbs. 
  • Add the egg and vinegar. 
  • Slowly add the water, only using enough so that the dough is moist but not too wet. The amount of water you use will depend on the type of flour.
  • Turn the dough out a floured surface and knead gently until the dough becomes smooth. 
  • Wrap well and chill for at least 30 minutes before use. 

Beef Empanada Filling
400g Beef (either cubed or minced
1 Large Onion (Chopped finely)
2 Cloves Garlic (Chopped finely)
1 Green Chili (Chopped finely)
1 tsp Cumin
2 tsp Paprika
1 tsp Chili powder
1 tsp Oregano
12 Green Olives (Sliced) (Optional)
1 Potato (Cut into small pieces)
Salt and Pepper
200 ml beef stock

Method:
  • Chop the potato into small pieces & boil in salted water until cooked. Drain & put aside.
  • Fry the onion, garlic & chili until the onions are translucent.
  • Add the beef and brown. Add the olives (optional). Season with cumin, chili powder, paprika, oregano, salt & pepper.
  • Add the beef stock and allow to reduce. You want the meat to be moist but not too wet. 
  • Adjust seasoning if needed.
Vegetarian Empanada Filling
1 Onion (Chopped finely)
1 Jalapeno Chili Pepper (Chopped finely)
5 Garlic Cloves (Minced)
500g Tomatoes (Peeled, seeded & chopped)
500g Spinach (Chopped)
200g Sweetcorn
1 Red Pepper (Diced)
Salt & Pepper
1 tsp Cumin

1 tsp Nutmeg
1tsp Curry Powder
1tsp Freshly Chopped Rosemary

Method:
  • Sauté onion until translucent. Then add the minced garlic, jalapeno, pepper, cumin, curry powder & rosemary. Cook for 2 minutes.
  • Add the spinach & cook until limp. 
  • Add the tomatoes and sweetcorn. Cook until all the liquid has evapourated.
  • Add salt & pepper. Mix thoroughly & allow to cool.
Now comes the fun bit....Filling the Empanadas!!

Method:
  • Preheat the oven to 180°C.
  • Removed the dough from the fridge. On a floured surface, roll the dough into a thin sheet.
  • Using a saucer or pastry cutter (depending on how big you are making the empanadas), cut the dough into circles.

  •  Place a spoonful of the filling onto one half of the pastry circle, making sure not to over fill. Wet the edge of the pastry with egg or water & fold over. 
  • Press the two sides together and crimp with a fork*. 
  •  Brush with egg and place on a greased baking tray. Bake for 10 minutes until golden. 

 
  • Enjoy.

*You may also do the intricate plait fold on the top. I'm not good enough yet but for more information see here

Thursday, July 21, 2011

Sensational Spanish Supper: Patatas Bravas with Chorizo


Yesterday I decided to try out a new recipe. This was brought about more by current financial situation (aka poverty) than by any particular wish to experiment culinarily. But I'm so glad I did. This is such a simple and filling recipe that's both food porn and comfort food in equal measures. It's a traditional spanish dish often served in tapas bars. The spicy chorizo adds a lovely kick and you can experiment by using different types of spiced chorizo (for my meal I used garlic & herb chorizo). This recipe serves around 3 or 4 people so you can reduce the proportions if you are making just for one.

 Ingredients:
1 Onion (Chopped)
2 Cloves Garlic (Chopped finely)
1kg Potatoes (Cut into approx. 2cm pieces)
250g Chorizo Sausage
1 Red Chili (Chopped)
1 Tin Chopped Tomatoes
1/2 - 1 tsp Paprika
1/2 - 1 tsp Cayenne Pepper
Salt & Pepper

Method:
  • Fry the onions, garlic & chili in some oil until the onions soften. Add the cayenne & the paprika (depending on how spicy you want it) & stir.
  • Add the tomatoes & simmer for 20 minutes until it reduces to a thick sauce.
  • Steam or boil the potatoes until soft.
  • Fry the chopped chorizo in a separate pan for a few minutes until it releases some of it's oils.
  • Add the potatoes & fry until both the chorizo & potatoes have started to turn brown. Alternatively you can deep fry the potatoes for a few minutes to turn them brown before adding them to the chorizo.
  • Season the sauce, adding more cayenne & paprika if needed.
  • Add the sauce to the chorizo & potatoes & serve.
  • Enjoy

Tuesday, July 12, 2011

Breaded Fishcakes with Lemon Mayonnaise


As I said in a previous blogpost about fish, it's really not my favourite foodstuff. Having said that, while I was waiting to move into my new home I had an unbelievable craving for fishcakes. I've been making these for years and they are so versatile.

You can use any fish you like and add whatever vegetables you wish. It's the combining of all these things that make the fishcakes different each and every time you make them. I like to make large fish cakes and have one per serving. You can either deep fry or shallow fry depending on your tastes.

Most recipes use potatoes to fill out the cakes but I like using just the fish so that the fishcake is light and breaks away beautifully when you cut into it. In this recipe I've combined it with a lovely lemon mayonnaise that adds a lovely tangy taste fishcakes and acts as a dressing for the salad underneath.

Fish Cakes
Ingredients:
500g White Fish
1 Green Chilli (finely chopped)
130g Breadcrumbs
 2 Eggs 
1 Onion (finely chopped)
Flour 
Salt & Pepper

Lemon Mayonnaise
5 tbsp Mayonnaise
Fresh Lemon Juice

Method:
  • Poach the fish until flaky.
  • Mash the fish, onion, chilli & one egg in a bowl and mix thoroughly together. If it is too wet add a small amount of flour. Season with salt and pepper.
  • Whisk an egg in a bowl. Prepare a plate with flour and another with breadcrumbs.
  • Now comes the fun part! Take a handful of the fish mixture and mould it into a large cake/burger shape. 
  • Dip the cake in flour and coat well, shaking off any excess. 
  • The dip the cake in the whisked egg, making sure its completely covered.
  • Then dip in the breadcrumbs and role until completely covered.
  • Deep (or shallow) fry until the breadcrumbs turn a dark brown. 
  • For the Lemon Mayonnaise, simply mix the mayonnaise with the lemon juice to taste (I like it very bitter)
  • Place the fishcake on a bed of salad leaves and drizzle the lemon mayonnaise over it.
  • Enjoy